Summer is the season for beach,sun and sea, yes but it’s also a season when many people take photos of the Milky Way because the sky is clear (though not always), the Milky Way itself is pretty visible (well depending on the place you live in) and vertical.
We must go into the basics before even beginning to touch the camera:
-Depending on the country and in which hemisphere you live in the position of the Milky Way will vary in elevation,intensity and of course position, I highly recommend the free app on Windows or Mac called Stellarium Here , with this app you can set any day of the year and hour to check the Milky Way presence.
-Where do you live? in a city, a village or a cabin in a forest?
It’s very important to understand that it’s nearly impossible to take a clear photo of the Milky Way from within a city or close by. The less the light pollution the better, so a small village in a mountain is a good place and it’s even better if you can go up to a high mountain camp. There are several apps that will give you maps of light pollution in your area based on GPS.
-Tripod!! It’s as elementary to have a tripod with you than a camera to take astrophotography, we are going to take photos with long shutter speed of 5 to 15sec.
-Check for the moon phases. The moon’s light can make it impossible to capture the Milky Way while the moon is up at the same time.
-An anti-mosquitoes spray. Yes you heard me, you are going to take several long photos in the night in summer or fall meaning you can be a mosquito target if you don’t put some mosquitoes repellent on your arms,hands and legs.
-A smartphone with GPS, as I have an Android phone, I highly recommend the free app Sky Map that you can download Here
-Check the weather outdoor!!
I took me 10 days to finally get a clear sky at night because I live in country where humidity is so high in summer that it quickly creates clouds or haze in the mountains, so even if Accuweather or any other Weather station will forecast a clear night it doesn’t mean that it will be like that, always keep an eye on the sky before preparing the hardware, you can try with your smartphone camera to see if any cloud hide somewhere.
-Check your battery! As you will see in this tutorial, we will have have to take tons of photos to have a chance to get one or two success, so be sure to have at least 70% of battery juice.
The technique
Now that everything is set for perfect or nearly perfect shooting condition, let’s talk about the technique we will use.
I thought for the past 2 years that the best technique for taking a good photo of the Milky Way even if you are facing some light pollution is the ETTR or Exposing To The Right technique. But unfortunately you will end up with very noisy results as you will have to use ISO 6400 and boosting up contrast and Clarity in post treatment.
I will use the Stacking technique in this tutorial which is much better than ETTR, here are the key points of stacking:
-No need for very high ISO, an ISO of 400 or 800 is enough, meaning low noise levels.
-The sum of the photos you take for stacking equal virtually to long time exposure without the risk of having star trails, for example you can take 10 x 10 seconds photos stacked into one which mean the equivalent of 1 minute and 40 seconds, though bare in mind you won’t have the super blown exposure of a ISO 800 1m40sec f2 photo but it will retain the high dynamic pixels information that are important to show up the Milky Way.
-Because the photos of stacking are much less exposed than ETTR you won’t lose villages or other earthly lighted parts of your photo.
-If one of your photo for stacking has let’s say a night bird like a bat passing by, you can just delete this shot as you have take many others.
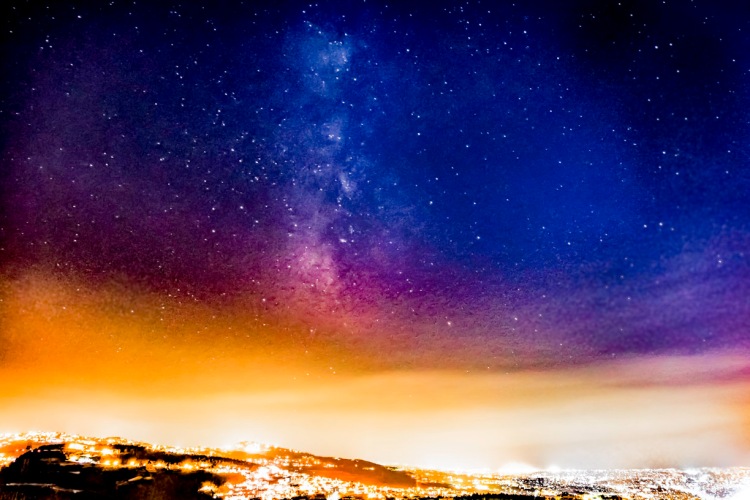
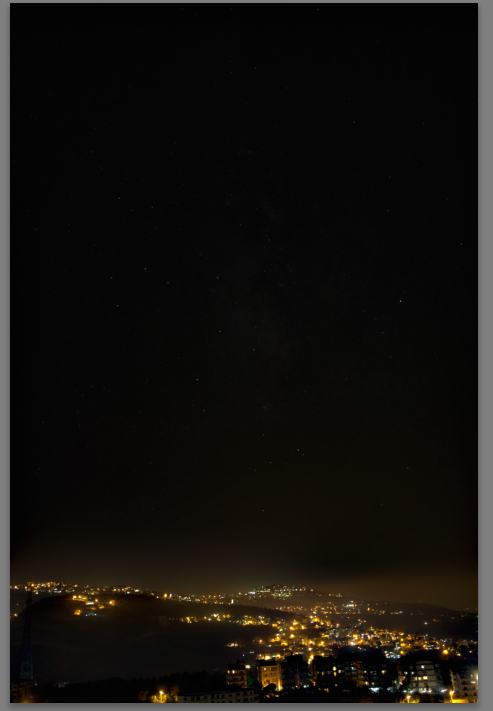
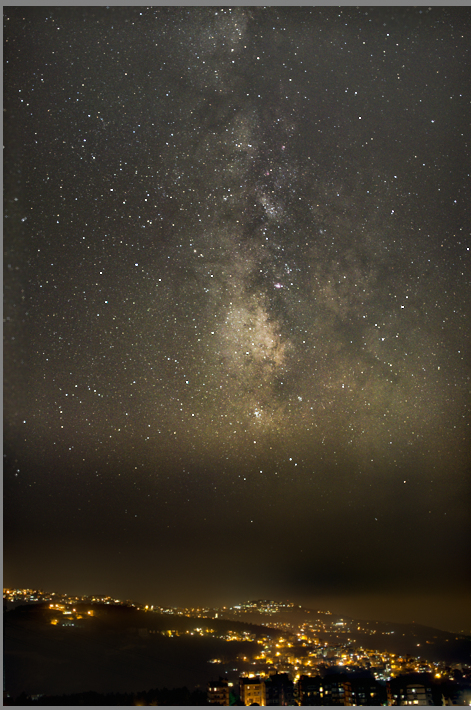
Here let me show the best photo I could get with ETTR and one of the Stacking result I got this summer:
ETTR

Stacking
You can see how much better is the Stacking result, with ETTR the light pollution is killing a big part of the photo and the Milky Way lacks details while suffering of high levels of noise, the village’s lights are also burned by the high exposure. The Stacked photo has some light pollution but it doesn’t affect the quality of the photo, the Milky Way is pretty detailed, noise levels are low and the earthly lights are perfectly controlled.
Taking the photos
You will need:
-A DSLR or Mirrorless camera, of course I highly recommend using a Fuji X-Trans camera.
-A tripod
-A fast and large SD card
-A shutter release controller if you don’t have a Fuji X-Trans camera (Fuji integrated the INTERVAL TIMER SHOOTING since the X-T1 and X-T10)
-Patience! The camera will take an average of 15 by 10 seconds sets
Ok so you picked a spot to take the Milky Way photos, put the camera on your tripod and enable GPS (phone only mode) on your smartphone, then open Sky Map if you are using Android or an equivalent on IOS.
Now if your app has the Milky Way option just point at it, in Sky Map you will have to find the ”teapot of Sagittarius” which is at the base of the Milky Way.
![Screenshot_20170913-223833[1].png](https://fujiandstuff.files.wordpress.com/2017/09/screenshot_20170913-2238331.png?w=750)
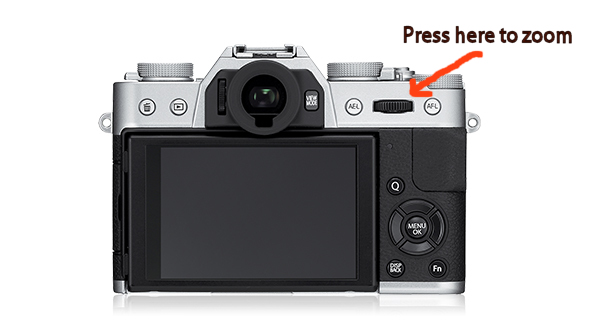
We will use Manual Focus to avoid blurry stars, set your lens to M and focus on any star in the sky till it’s a perfect white sharp point, you can press on the wheel on the top right near the LCD to digitally zoom with the X-T1 and X-T10 (and newer Fuji models).
Set the images to RAW (Raf), it’s essential for editing later
-Place the smartphone screen over the camera’s screen to match the Milky Way (or teapot) position.
-Now if you have a wide angle lens like 12,14 or 16mm you can put your camera in landscape mode, for narrower lenses like 21,23,27mm it’s certainly better to put it in portrait mode to catch a maximum of the Milky Way.
-Set your ISO to 800 if you have a lens with f1.4 to f2 and 10 seconds for the shutter time, for f2.8 and f3.5 lenses it would be better to choose a higher ISO like 1250 or even 1600 and a shutter speed of 14 or 15 seconds, don’t go beyond 15 seconds though or you will have noticeable stars trails.
-Set your lens to the maximum aperture, so if your lens is f2 set it to f2.
-In Fuji menu go to INTERVAL TIMER SHOOTING
-Set Interval to 1s and number of times to 15, this is the sweet spot for me, you can try less or more if you want, but of course the more you take the more you risk to have undesired objects like a passing cloud or bird or even vignetting.
-Set Start Waiting Time to 1m, you can set it to 0 but the 1st photo could be blurry as you won’t have the time to take off your hand from the camera before it starts shooting, or set it to 16 photos and 00m and you will delete the 1st photo of each set.
Of course if your camera doesn’t have the same option you will have to use a shutter release controller to program the number of consecutive shots.
-Now take a brake and wait that the camera does all the work, once the 15 photos are taken the screen preview will resume.
-When a set is finished, place back the lens cap on your lens and take a photo without touching any settings or the tripod with the lens cap ON, of course just take one photo for every set not 15, it will be a pitch black photo that we will use as ”Noise image” later. I recommend to put a self timer to 2 or 10 sec for this photo to avoid shacking.
-Take other set of photos, with trees without trees, higher or lower position in the sky…It will eat your SD card memory but you will be happy afterward that you have a choice of sets as you can’t see yet how the end result will be. unless you live in the middle of a desert or at 3000m altitude far from any light pollution so you can see the Milky Way with your own eyes.
Stacking
We will need 2 software, one for stacking the photos and the other for the usual editing.
I chose Sequator on PC Windows for Staking the photos, it’s free, it’s fast, it’s compatible with Fuji Raf and most importantly it’s easy to handle. It’s also continuously updated so check for updates from time to time. Grab it Here
And Adobe Lightroom for the usual editing, it has all the tools needed as well as free filters for astrophotography.
-So let’s open Sequator
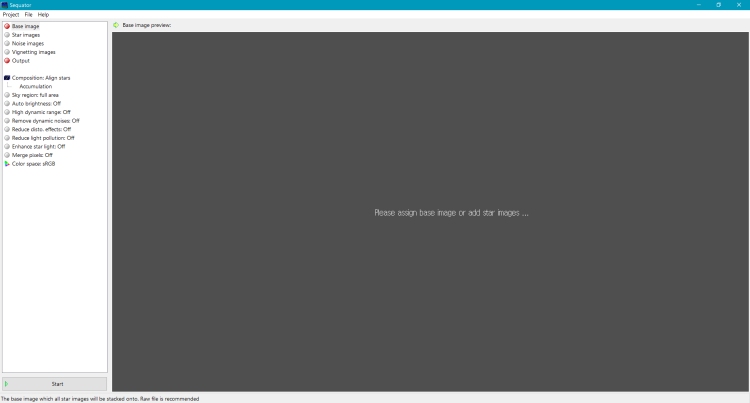
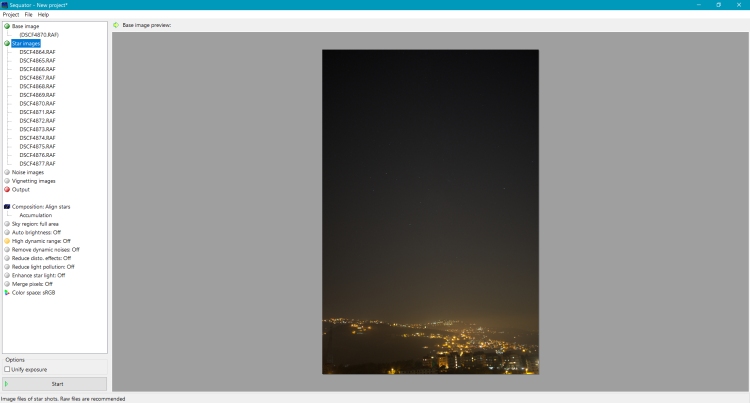
-Now double click on ”Star images” and chose all the 15 photos of the set, Sequator will pick itself the best image as ”Base”
It will look like that, here I have a total of 14 photos because I removed 1 that had a spot light from a restaurant.
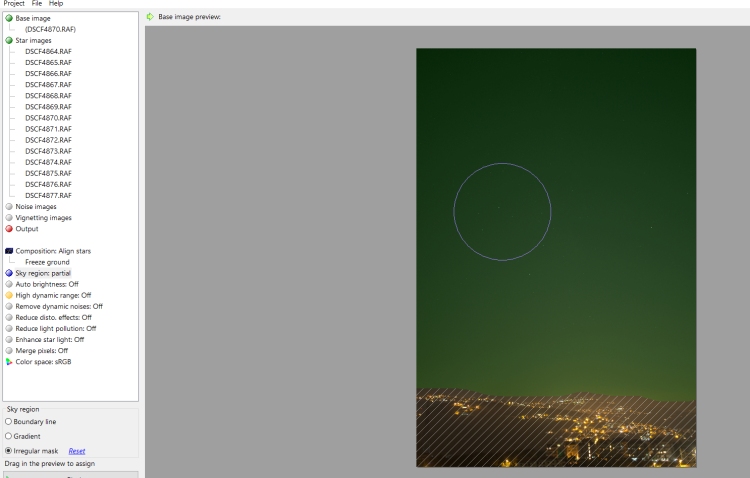
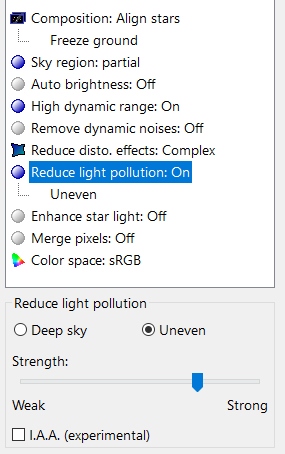
-Now let’s go to ”Composition” and select ”Align stars” and ”Freeze ground”

-Then in ”Sky region” pick ”Irregular mask”, you will have to manually select the sky part of the photo, of course if the photo is 100% sky then cover it fully by the mask. Here we have the lower part of the photo that is mountains so we will only mask (green) the sky part like that:
-Then put the ”High Dynamic Range” to ON
-Reduce disto. effects: Complex
-Now about the ”Reduce light pollution” option, put it to ”uneven” and set ”Strength” depending on how strong is the light pollution in your photos, here for instance it’s mid to high (you can see the orange light above the mountains) so I have set the ”Strength” to medium +1, about the I.A.A option enable it only if you have trees in part of the photos.
-Now let’s add the ”Noise images” , one will be enough as it will be applied to every single photo. So go and pick the full black Noise image you took after every set, if you didn’t or forgot to do it, you can simply set your camera to the exact same settings and take the photo with the lens cap ON.
-Finally choose the ”Output” image file name to be saved in the folder of your choice, it will be a TIFF image. Press on Start. Now wait a couple of minutes for Sequator to stack the photos into one.
You will get a dark photo, don’t panic, it’s normal because we used the light pollution reduction option, we will be able to work in Lightroom or any other professional photo editor, I am usually a Capture One user but for Astrophotography LR has more options and available filters to use.
The result I got in Sequtor
Editing
Ok now that we are in LR let’s edit the photo and reveal the Milky Way.
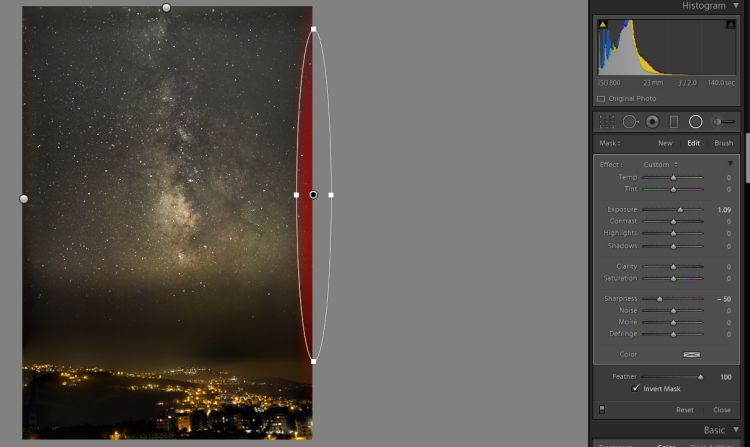
-First thing first my photo has a small angle to be corrected because my tripod wasn’t perfectly aligned, with the ”Crop overlay” option or any perspective correction option other software you can easily correct it.
-If your photo is 100% sky and not like my photo part sky/earth use the following settings for the whole photo, for my type of photo which is sky/earth I used a Graduated Filter on the sky region only.
-Boost exposure to the max
-Boost Clarity to the max
-Boost Contrast to 80 to 100
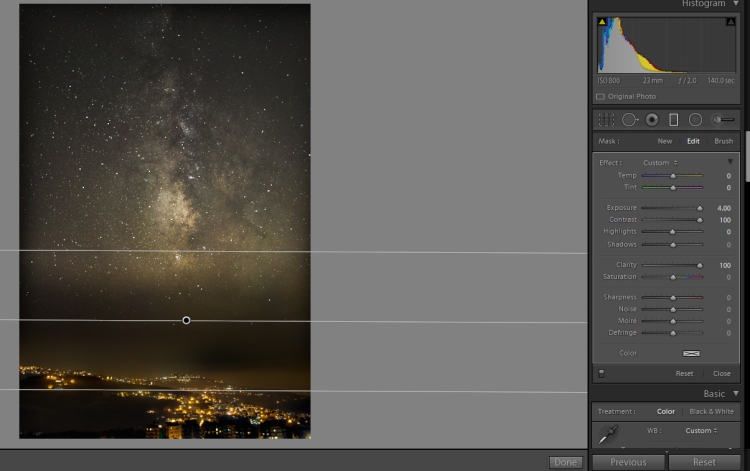
-You can use another Graduated filter to boost Exposure on the higher part of the photo as the boosted contrast can make it a bit dark.
-We already have a great Milky Way in the photo, now we have to fix the WB to your liking, you can do it into a blueish,greenish or warm tint, in my photo because the Light pollution is orange I used a warm tint for the sky.
In my case I have set Temp to +5 and Tint to -5 to match the earthly lights.
-Open an Adjustment Brush and set Sharpness to -50 to -70 depending on how much stars you have outside the Milky Way.
Use this Brush on all the sky area outside the Milky Way, it will soften the stars that we don’t need to be in focus and let the Milky Way the sharpest part of the sky.
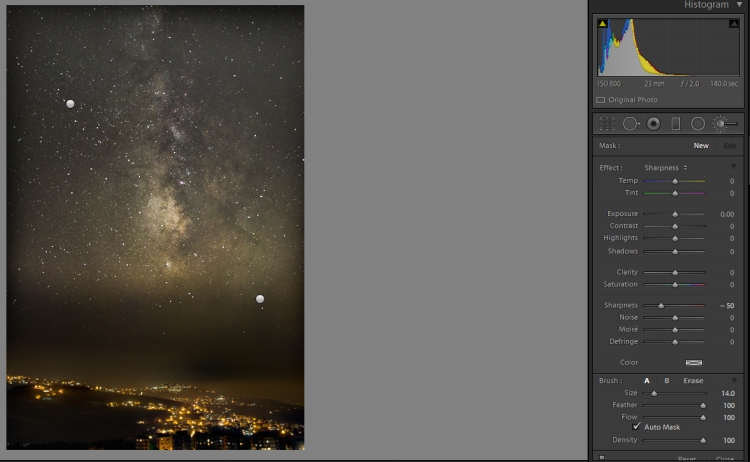
-As you can see we have some vignetting on the top, left and right borders, unfortunately you can’t take them out with Vignetting control in LR or other editors because these vignettes result from the stacking process and it’s not a lens problem, we will have to take them out manually.
You can either simply crop the photo, or use Graduated filters or/and Radial Filter.
I used Radial Filters for my photo with of course the Exposure boosted till the selected are match the rest of the sky
Our photo is done!
You can play now with filters like the free ones given by Lonelyspeck Here
One of the many filter from Lonelyspeck pack on my photo:

Please as usual feel free to comment or ask any question about this tutorial

“One of the many filter from Lobelyspeck pack on my photo:” Minor typo
LikeLike
Thanks for pointing out
LikeLike
Pingback: Welcome to Fuji and Stuff | Fuji and Stuff
Thanks for the awesome tutorial! Will try this on our mountain hiking trip 🙂
LikeLike
You are welcomed
LikeLike
Great tutorial! How bright was the town you were shooting in? What was the light pollution rated on the bortles scale?
LikeLike
Thanks! It was mixed between dark sky toward East to light polluted toward West by a mid polluted South (in the photos it was toward South), I would say 4 on the bortles scale
LikeLike
THANKS!!!
Only thing, that might be cool (Maybe in another Blog) would be a description what all the other not or only shortly mentioned funktions in Sequator are changing in the result… maybe you‘ll find some Time?!
LikeLike
Excellent Tutorial.will fuji 10-24 lens will work?I am novice in Astrophotography,so just thinking to give it a try.Please suggest
LikeLike
Yes it will work but because it’s an F4 lens you will have to compensate with a higher ISO, try with ISO 2000 instead of 800. BTW I have found that the new 24mp sensor of X-T20 and X-T2 cameras need also a little boost in ISO, I am now using ISO 1250 on my X-T20
LikeLike
great tutorial! do you recommend 10sec even for a 12mm rokinon f2 that should be able to achieve a longer exposure without star trailing?
LikeLike
You could try with 13 seconds but not more. All the purpose of stacking is to take not very long exposures so the photos stay sharp and clean
LikeLike
Great tutorial!,
Well explained, everything is there.
Thanks so much for sharing this piece of art.
LikeLike
A very detailed tutorial on every single point. Thank you very much
LikeLike